 The
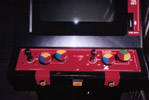
original control-panel was not usefull for my project. Although
the cabinet had a SF-II-pcb in it, the control-panel had only
room for 2 players with 3 buttons each, with the holes drilled
in such a way, I couldn't drill extra holes :( There were two
3-way buttons for each player, I could have used them, but they
are *really* ugly.
The
original control-panel was not usefull for my project. Although
the cabinet had a SF-II-pcb in it, the control-panel had only
room for 2 players with 3 buttons each, with the holes drilled
in such a way, I couldn't drill extra holes :( There were two
3-way buttons for each player, I could have used them, but they
are *really* ugly.
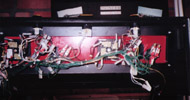
So I started to work on a new control-panel. If you ever have
to choose between a cabinet with a metal panel or one with a
wooden panel, go for the wooden panel, it's way easier
to handle or rebuild. I have a metal one, and I can tell you,
it's a real pain in the ass to make a new one. I cutted 4 pieces
of metal before I got one that fitted right and looked nice
enough. Maybe I'll make some room later for a wooden panel,
but for now I'll have to do with the metal one (although it
does look nice now).
 Due the the hole in the wood, I have only a space available
of 9x52 cm. for the panel. One good thing is that I don't
need to put the control-buttons, like player-1 start or ESC,
in the panel. They will be mounted on some other places on
the cabinet, the cabinet even came with a player-1, player-2
start AND a game-select button.
Due the the hole in the wood, I have only a space available
of 9x52 cm. for the panel. One good thing is that I don't
need to put the control-buttons, like player-1 start or ESC,
in the panel. They will be mounted on some other places on
the cabinet, the cabinet even came with a player-1, player-2
start AND a game-select button.
Looking around on some websites, and following some WWW-threads,
I decided to use the following layout for the (Happ Ultimate)
joystick and buttons:
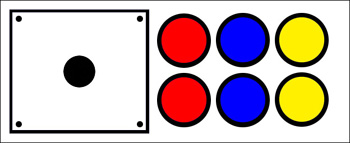
(Click for a version ready for printing, size
approx. 9x21 cm)
Using this layout for both player 1 and player 2, shifted to
both sides, I have a free space of approx. 9 cm. between the
right-most buttons of player 1 and the left-most side of the
player-2 joystick. This should be enough for mounting a trackball
later on.
I went out to a hardware-store and bought a 27 mm. hole-saw,
which can be used for both wood as metal-drilling. The buttons
have a 28 mm. diameter, so I had to use a file to make some
more room. Currently I'm waiting for the paint to dry. I have
the panel painted 4 times, it's real smooth, but it'll take
a day or two before the paint is hardened.
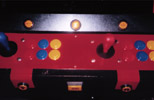 After
drilling the holes and painting the panel, I drilled 4 extra
holes in the cabinet for Mame-specific buttons. I used low-profile
illuminated buttons for this task, and they came out very
nice.
After
drilling the holes and painting the panel, I drilled 4 extra
holes in the cabinet for Mame-specific buttons. I used low-profile
illuminated buttons for this task, and they came out very
nice.
I then rewired the cabinet, so I could use the panel for MAME
aswell as original Jamma-pcb's. This means I will have to add
a few (two or three) single-pole, double-throw switches for
setting the cabinet into MAME or Jamma-use. Next this to do
was setting up the computer that goes inside the cabinet.


